
Run a Guided Installation
Claim the Selora Hub on site and follow the guided installation: a live runbook built from the installation manifest that detects devices as they pair, builds the planned scenes, automations, and dashboards, and keeps Selora Assistant at your side.
A guided installation turns the installation manifest into a live runbook for install day. The manifest describes the home; the guided installation walks you through building it, one step at a time, in the order the work happens. Steps advance on their own when Selora can see the result in Home Assistant, and Selora Assistant is available at every step.
Before you start
- The project is at the installation stage, and its manifest lists the devices and integrations for the home.
- You have the Selora Hub for the home with you. Its claim code is shown on the hub’s screen, or at
http://selora.localfrom a device on the same network. - To have Selora build the scenes, automations, and dashboards for you, Selora AI must be enabled on the installation.
Start the installation
There are two ways in:
- From the hub claim. Claim the hub as usual. Selora Connect asks Is this hub for one of your projects? Pick the project and you land in its installation console. Claiming the hub onto the project also confirms the install date as today.
- From the project page. Open the project and click Start installation on the installation card. The hub does not need to be online yet: claiming it is one of the first steps of the runbook. Once a session is live, the same card reads Continue installation.
Projects that cannot take the hub yet are listed in the claim flow but greyed out, with the reason: the project is not at the installation stage, or the home’s current hub is still online.
An installation can span several days. Leave the console and come back to it from the project page; the session picks up where you left off.
The console
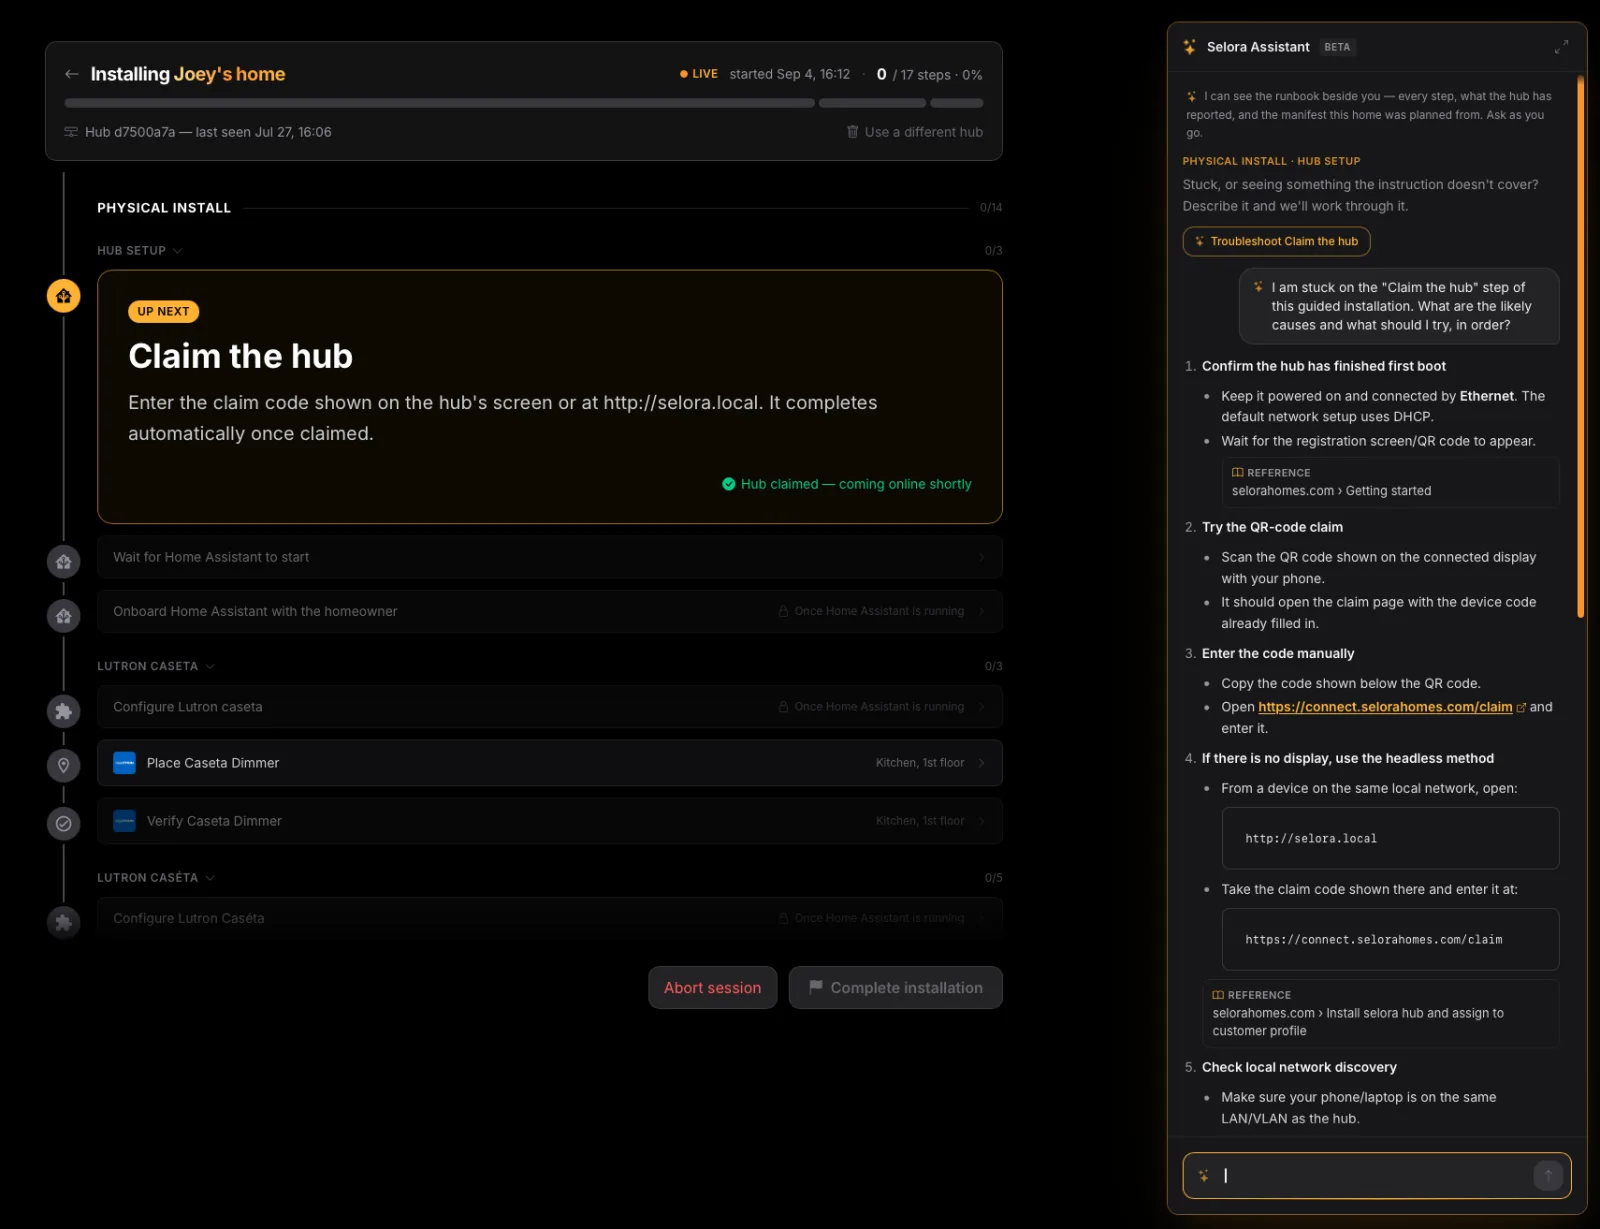
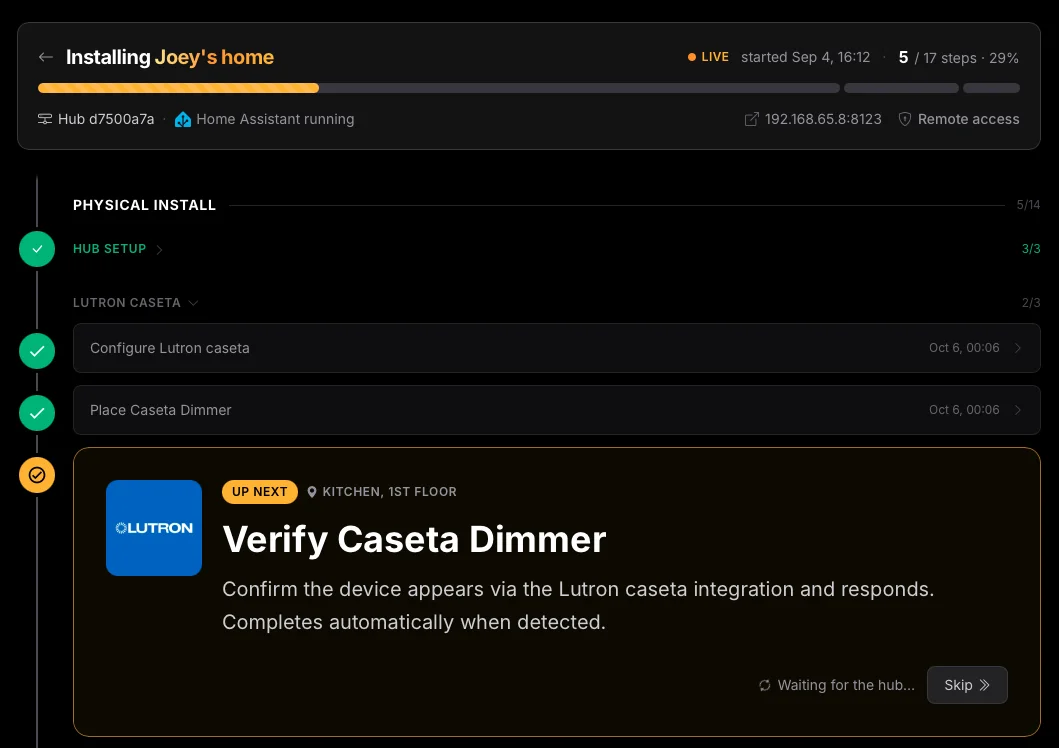
The header shows the home, the hub linked to the session, and your progress across the runbook. Below it, the runbook is split into three phases:
| Phase | What it covers |
|---|---|
| Physical install | Hub setup, then the passwords and accounts each integration needs, then one step per device, completed when the hub detects it. Devices are grouped under the integration they belong to, with the area they go in. |
| Programming | The scenes, automations, and dashboards from the manifest. |
| Wrap-up | The walkthrough and handover with the homeowner. |
The next step is highlighted as Up next. Steps that depend on Home Assistant, like configuring an integration, are locked with Once Home Assistant is running until the hub reports it is up. Steps done inside Home Assistant link straight to the hub’s Home Assistant.
Remote access to Home Assistant
A guided installation gives you remote access to the home’s Home Assistant for the time of the installation, without the homeowner approval that remote access normally requires.
Once the hub is claimed and Home Assistant is running, Enable remote access appears in the hub row at the top of the console, next to the hub’s local Home Assistant address. While Home Assistant is still starting, the option is not shown yet.
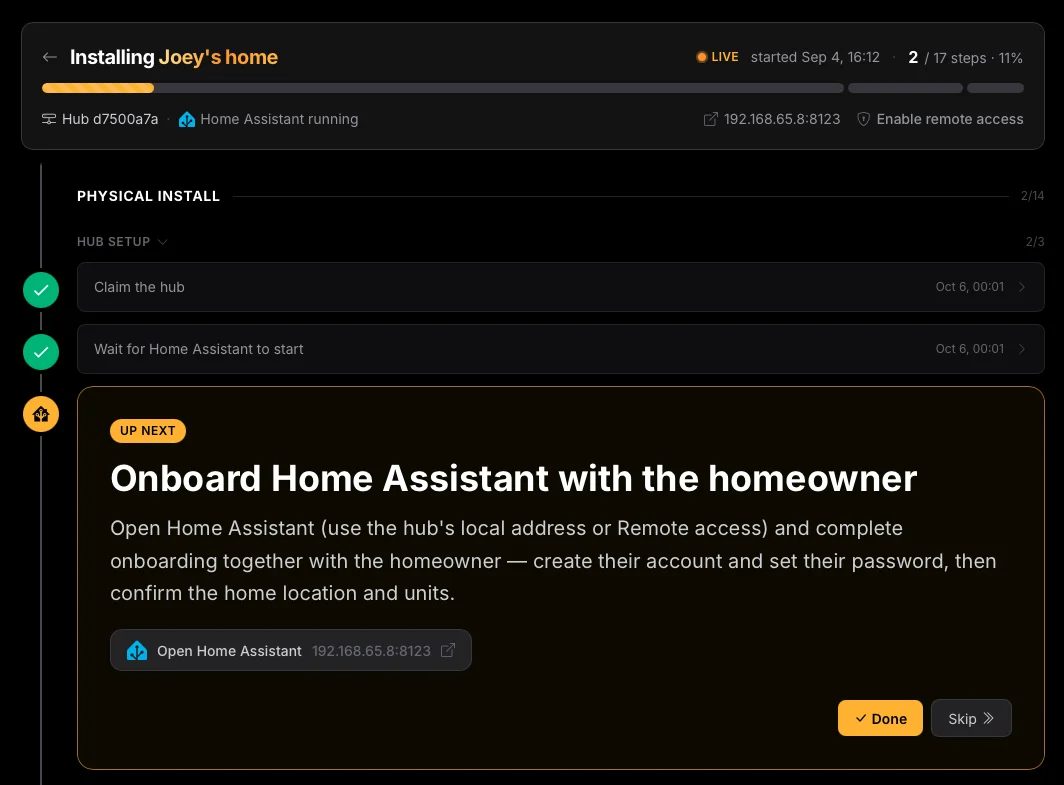
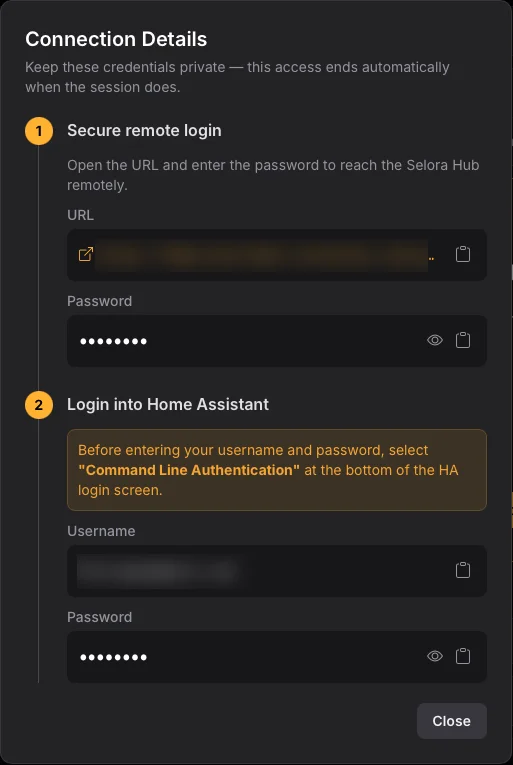
Click it to create your access. The Connection Details dialog shows two sets of credentials:
- Secure remote login: a URL and a password that reach the Selora Hub from anywhere.
- Login into Home Assistant: a username and a one-time password. On the Home Assistant login screen, select Command Line Authentication at the bottom before entering them.
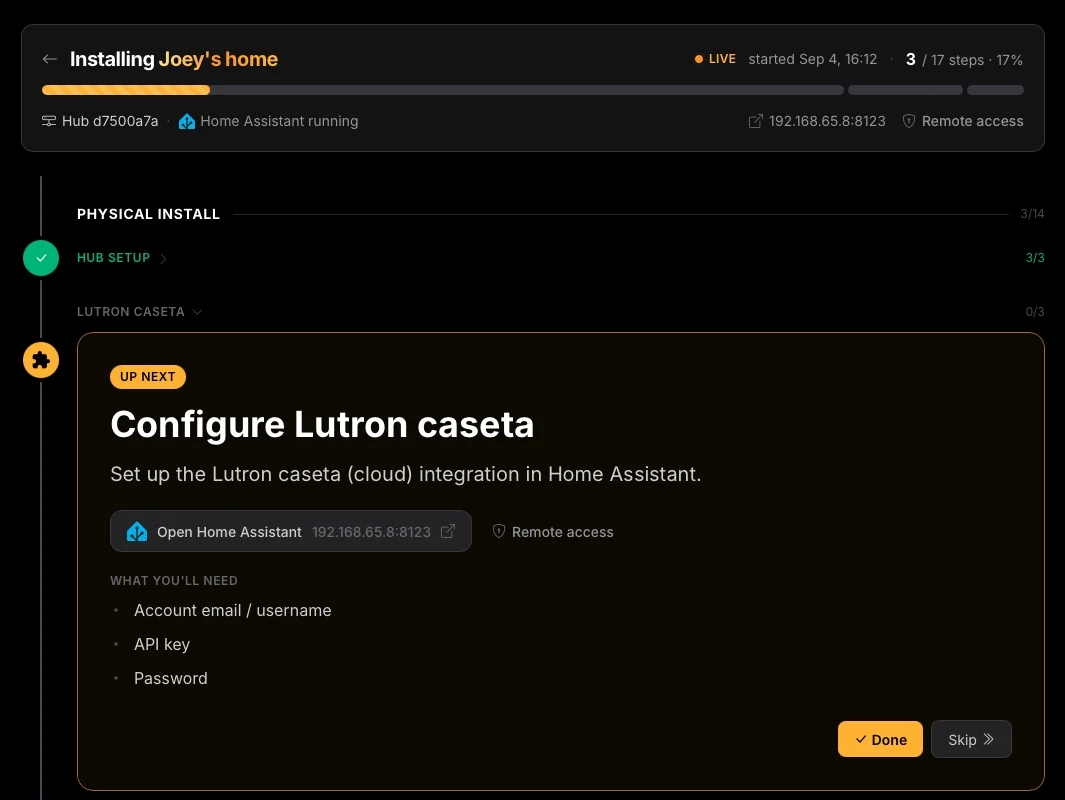
Once access is enabled, the hub row shows Remote access instead, which reopens the dialog from the browser you enabled it in. Steps done inside Home Assistant also show a Remote access link next to Open Home Assistant.
- Remote access is available from the scheduled install date. Claiming the hub onto the project sets that date to today.
- Each installer on the project enables their own access, and the credentials are shown only to them. If you already have remote access to this hub through an approved support request, the console uses that instead.
- Access is removed automatically when you complete or abort the installation. You do not need to revoke anything.
Integrations and devices
Each integration in the manifest has its own section in the runbook: a step to configure the integration, then the steps for each of its devices.
The configure step links straight to Home Assistant, locally or through remote access, and lists What you’ll need: the accounts, keys, and passwords the integration asks for. Set it up in Home Assistant, then click Done.
Each device then has one step, showing the brand and the area it goes in. Install the device at its planned location and add it the way its manual says, for example to the manufacturer’s app or bridge, so the integration can discover it. There is nothing to click: the step reads Waiting for Home Assistant to find it…, then Found — waiting for it to respond…, and completes on its own once the device responds.
While the session is live, the hub reports the devices Home Assistant sees, and Selora Connect matches each one against the manifest, using its brand, model, protocol, and the step you are working on.
If a device does not advance, check that it finished pairing in Home Assistant and that it is the brand and model the manifest planned. When the manifest holds several identical devices, work on one step at a time so Selora knows which one you just paired.
Steps you will not do on this job can be skipped with Skip.
Programming is built for you
When every device and integration step is finished, the hub is online, and Home Assistant is running, Selora builds the Programming phase in Home Assistant:
- Floors and areas are created as planned, and every paired device is moved into the area the manifest put it in.
- Scenes and automations are written by Selora AI on the hub, against the home’s real entities. Scenes are built first, so automations can use them.
- Dashboards are laid out from your description, using the devices that paired, as new dashboards. The homeowner’s existing dashboards are left as they are.
Each step shows building… while it runs, then what was built, with a link to it in Home Assistant. Steps built by Selora are verified automatically.
If the hub cannot be reached, the build waits and retries. If one item cannot be built, for example because no paired device matches what the scene asks for, its step stays open with a How to build this guide: ask Selora AI in the Home Assistant sidebar, or follow the steps to build it by hand. If you already built something by hand under the same name, Selora does not create a duplicate.
Ask Selora Assistant
Selora Assistant sits next to the runbook for the whole installation. It knows the Selora device catalog , the Selora documentation, and the state of this installation: every step, what the hub has reported, and the manifest the home was planned from.
- Use Troubleshoot for the step you are on to get the likely causes, in order, with links to the relevant guides.
- Ask anything else in your own words: which bridge a device needs, why a sensor has not appeared, what the homeowner needs to provide for an integration.
Selora AI usage during a live guided installation, in Selora Assistant and in Selora AI on the hub, is not counted against the homeowner’s allowance.
Finish or abort
- Complete installation ends the session and records which real device fulfilled each planned one. If the install date has arrived, the project is completed too.
- Abort session ends the session without completing anything. You can start a new one from the project page.
Either way, remote access granted for the installation is removed. The runbook stays on the project as a read-only record of the install.
Last modified October 6, 2026: docs(guided-installation): name the new device waiting labels (26279ed)