MCP & Agent Skills
Connect external AI agents to Selora AI using the Model Context Protocol (MCP) — setup, client configs, Docker networking, and troubleshooting.
1. Enable Selora AI
Before connecting MCP clients, make sure Selora AI is installed and running on your Home Assistant instance.
Once Selora AI is installed, your MCP Server URL is displayed in the Selora AI settings panel under Remote Access & MCP Authentication. Copy this URL — you will use it in your MCP client configuration.
Selora Hub users get a remote HTTPS URL (e.g.
https://mcp-xxx-xxx.selorabox.com/api/selora_ai/mcp) with OAuth authentication
configured automatically.
Other users get a local URL (e.g.
http://homeassistant.local:8123/api/selora_ai/mcp). If your HA instance uses a different
hostname, IP address, or port, adjust accordingly.
Docker users: homeassistant.local will not resolve from outside the container network.
Use the host machine’s local IP address (e.g. http://192.168.1.100:8123/api/selora_ai/mcp)
or the Docker container name if your MCP client is also running inside Docker on the same
network (e.g. http://homeassistant:8123/api/selora_ai/mcp).
2. Authentication
There are three ways to authenticate MCP clients with Selora AI:
| Method | Best for |
|---|---|
| Selora Connect (OAuth 2.0) (recommended) | Selora Hub users and anyone with a Selora Homes account. No tokens to manage — authentication happens via your browser. |
| Selora AI Token (recommended for token-based auth) | MCP-only access with granular permissions (read-only, admin, or custom per-tool). Created in the Selora AI settings panel. |
| HA Long-Lived Token (not recommended) | Grants full HA access — not scoped to MCP. Use only as a last resort. |
Option A: Selora Connect (recommended)
Selora Connect uses OAuth 2.0 — your MCP client authenticates through your browser, no tokens to create or rotate. This is the most secure option.
Selora Hub users get this automatically. Your MCP Server URL is displayed in the Selora AI integration settings under Remote Access & MCP Authentication. It looks like:
https://mcp-xxx-xxx.selorabox.com/api/selora_ai/mcp
Copy this URL and use it in your MCP client config. When the client connects for the first time, it will open your browser for a one-time OAuth authorization.
Non-Selora Hub users can also use Selora Connect by linking their Home Assistant to a Selora Homes account. In the Selora AI integration settings, toggle Selora Connect under Remote Access & MCP Authentication and follow the authorization flow.
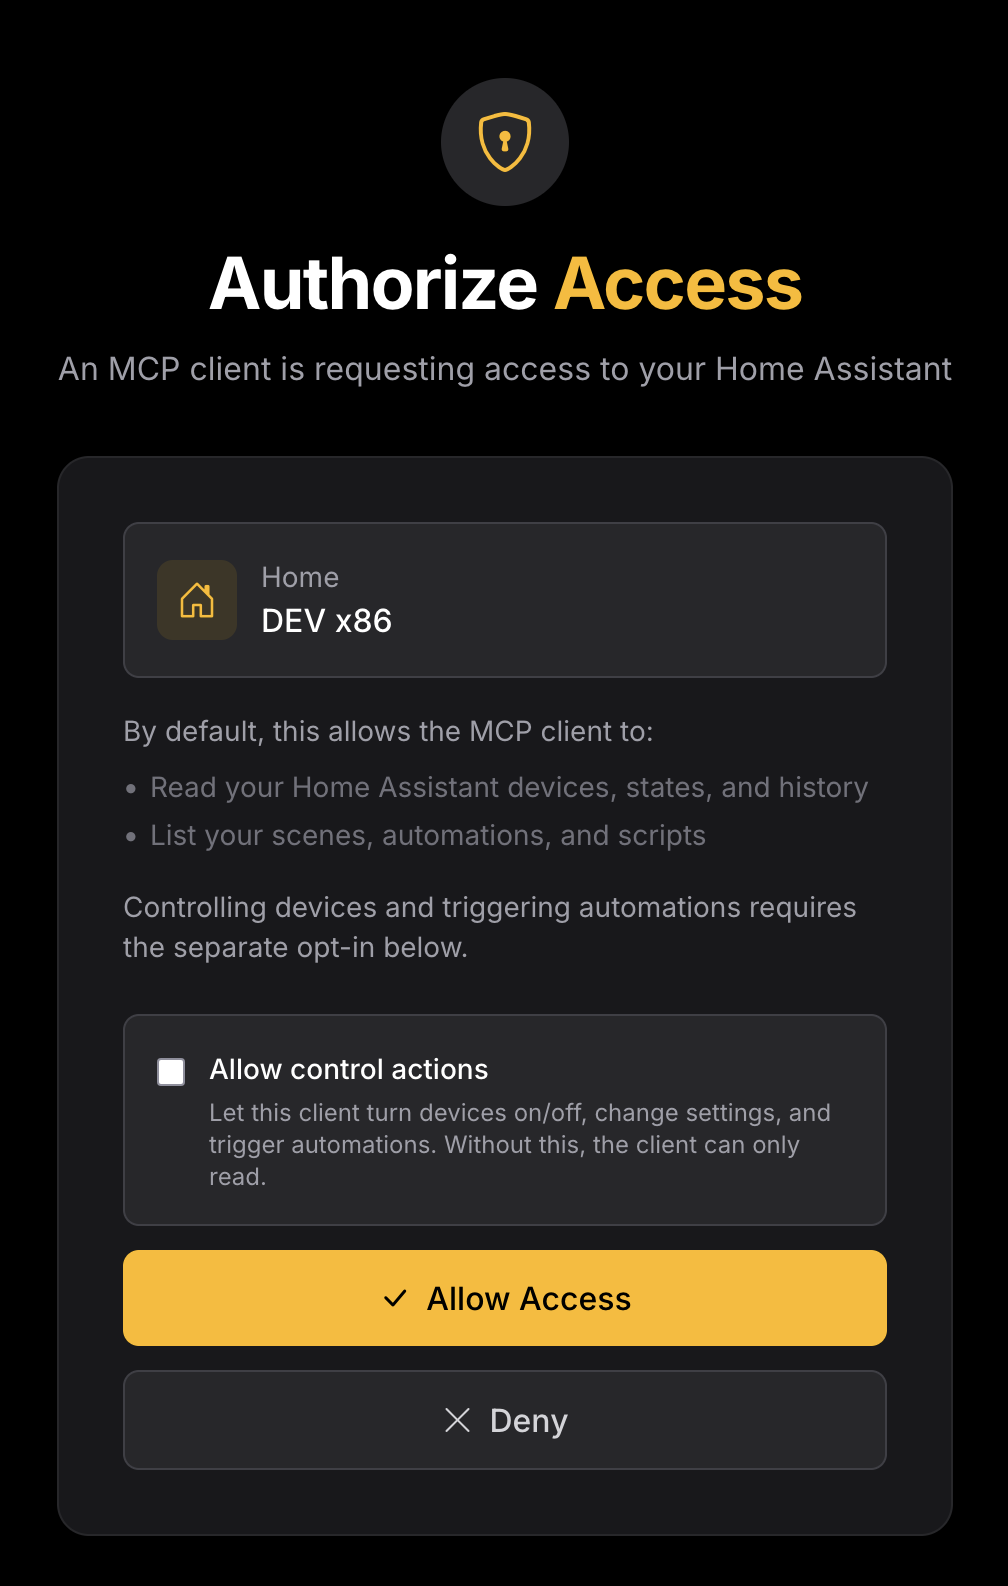
Read-only by default, control actions are opt-in
When an MCP client connects, your browser opens an Authorize Access screen. By default, authorization grants read-only access. The client can read your devices, states, and history and list your scenes, automations, and scripts, but it cannot change anything.
Controlling devices and triggering automations requires a separate opt-in. Tick Allow control actions on the authorization screen to let the client turn devices on/off, change settings, and trigger automations (for example, “turn on the front porch lights”). Leave it unchecked to keep the client read-only.
You can revoke a client’s authorization at any time from the Selora AI integration settings.
Option B: Selora AI Token
Selora AI tokens are scoped to the MCP server only — they cannot control other parts of Home Assistant. Permissions are highly granular: pick a Read-only or Admin preset, or choose Custom to select exactly which tools the token may call. Write operations are tagged Admin, so you can hand out a token that (for example) lists and reads automations but cannot create, accept, or delete them. Each token also takes an optional expiration.
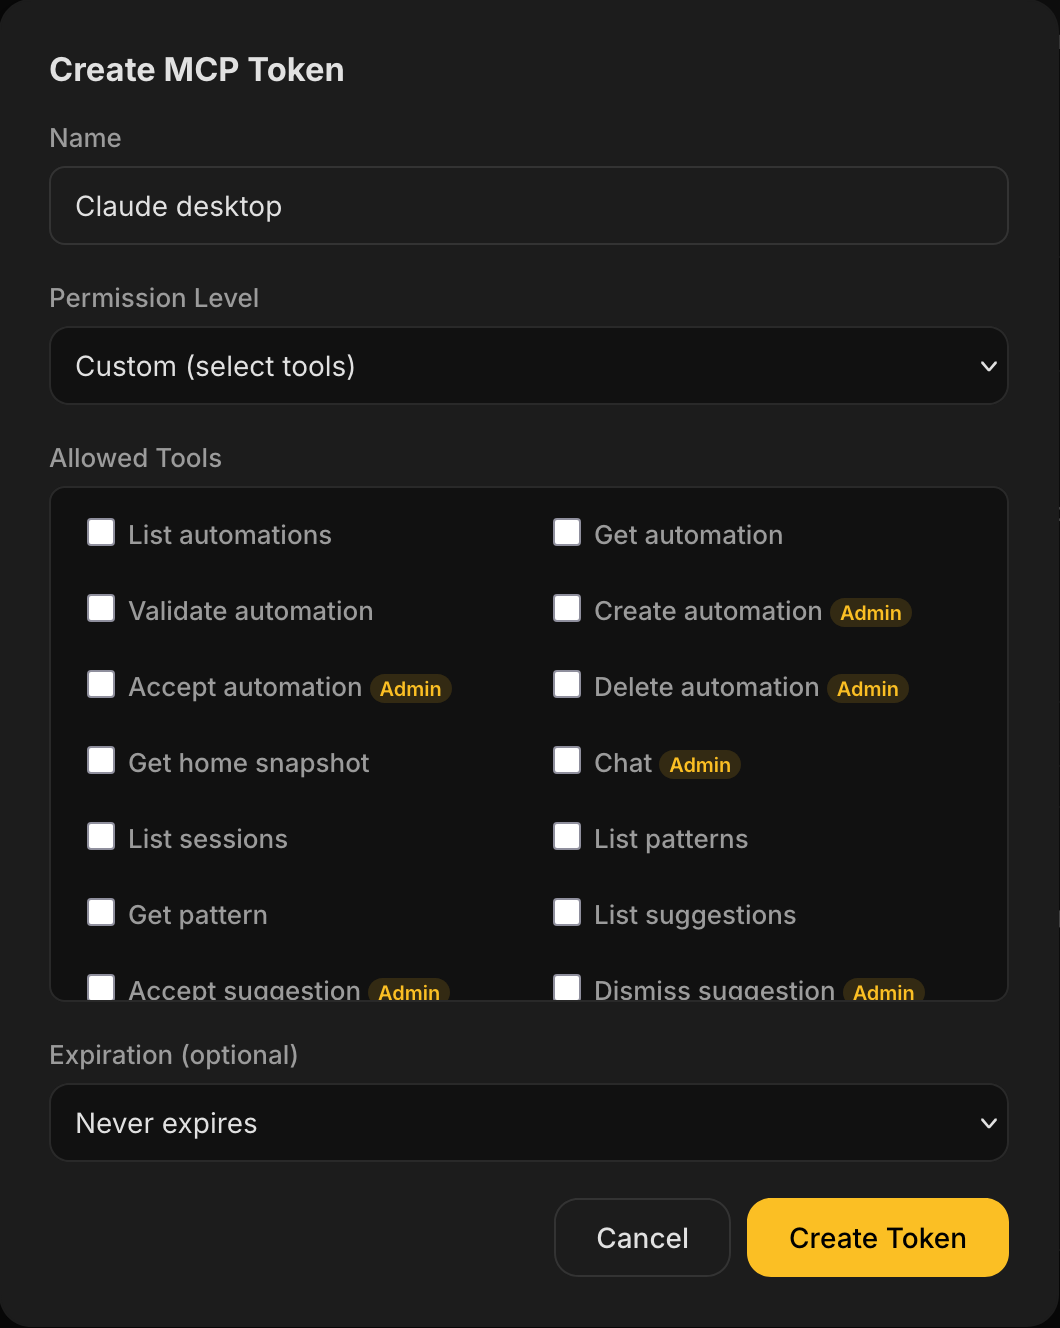
Create a token in the Selora AI settings panel under Remote Access & MCP Authentication. See MCP Tokens for details on permission levels and expiration options.
Use the token in your MCP client config the same way as an HA token (see examples below).
Option C: Home Assistant Long-Lived Token
In Home Assistant go to Profile → Security → Long-Lived Access Tokens → Create Token.
Give it a descriptive name (e.g. selora-ai-mcp) and copy the token immediately — it is
only shown once.
3. Add the Server to Your Agent Client
With Selora Connect (OAuth 2.0)
If you’re using Selora Connect, mcp-remote handles the OAuth flow automatically — it
opens your browser for authorization on first use. No tokens or headers needed.
{
  "mcpServers": {
    "selora-ai": {
      "command": "npx",
      "args": [
        "-y",
        "mcp-remote",
        "https://mcp-xxx-xxx.selorabox.com/api/selora_ai/mcp"
      ]
    }
  }
}
Replace the URL with your MCP Server URL from the Selora AI integration settings.
Requirements: Node.js 18+ installed on the machine running your MCP client. mcp-remote is
fetched automatically via npx — no separate install needed.
With a Token (Selora AI Token or HA Token)
There are two ways to connect with a token. Choose based on what your client supports:
| Approach | When to use |
|---|---|
mcp-remote via npx (recommended) | Works with any MCP client that supports stdio — including Claude Desktop and most others. Requires Node.js. |
| Native SSE | Use only if your client explicitly supports native SSE transport with custom headers (e.g. some Cursor and Windsurf versions). |
{
  "mcpServers": {
    "selora-ai": {
      "command": "npx",
      "args": [
        "-y",
        "mcp-remote",
        "http://homeassistant.local:8123/api/selora_ai/mcp",
        "--transport",
        "http-only",
        "--header",
        "Authorization: Bearer ${SELORA_TOKEN}"
      ],
      "env": {
        "SELORA_TOKEN": "<your-token>"
      }
    }
  }
}
Replace <your-token> with the token from step 2.
Claude Desktop
Config file location:
- macOS:
~/Library/Application Support/Claude/claude_desktop_config.json - Windows:
%APPDATA%\Claude\claude_desktop_config.json
If the file does not exist, create it. If it already contains an mcpServers block, add the
selora-ai entry inside the existing block.
With Selora Connect:
{
  "mcpServers": {
    "selora-ai": {
      "command": "npx",
      "args": [
        "-y",
        "mcp-remote",
        "https://mcp-xxx-xxx.selorabox.com/api/selora_ai/mcp"
      ]
    }
  }
}
With a token:
{
  "mcpServers": {
    "selora-ai": {
      "command": "npx",
      "args": [
        "-y",
        "mcp-remote",
        "http://homeassistant.local:8123/api/selora_ai/mcp",
        "--transport",
        "http-only",
        "--header",
        "Authorization: Bearer ${SELORA_TOKEN}"
      ],
      "env": {
        "SELORA_TOKEN": "<your-token>"
      }
    }
  }
}
Restart Claude Desktop after saving.
Cursor
Open Cursor Settings → Features → MCP Servers and click + Add MCP Server. Select
Command as the type and paste the command/args block from the appropriate approach
above (Selora Connect or HA token).
For native SSE with a token (if your Cursor version supports it), select SSE and enter:
- URL:
http://homeassistant.local:8123/api/selora_ai/mcp - Header key:
Authorization - Header value:
Bearer <your-token>(Selora AI token or HA token)
Windsurf
Windsurf stores MCP configuration in ~/.codeium/windsurf/mcp_config.json (macOS/Linux) or
%USERPROFILE%\.codeium\windsurf\mcp_config.json (Windows). If the file does not exist,
create it. Add the selora-ai entry:
{
  "mcpServers": {
    "selora-ai": {
      "command": "npx",
      "args": [
        "-y",
        "mcp-remote",
        "http://homeassistant.local:8123/api/selora_ai/mcp",
        "--transport",
        "http-only",
        "--header",
        "Authorization: Bearer ${SELORA_TOKEN}"
      ],
      "env": {
        "SELORA_TOKEN": "<your-token>"
      }
    }
  }
}
Restart Windsurf after saving. You can also add it through Windsurf Settings → MCP if your version has a UI for it.
Open WebUI
Open WebUI is a self-hosted chat interface commonly paired with Ollama. If you are already using Ollama as your Selora AI backend, Open WebUI lets you interact with the same local model while also having access to Selora AI’s MCP tools.
In Open WebUI, go to Admin Panel → Settings → Tools and add a new tool server:
- URL:
http://homeassistant.local:8123/api/selora_ai/mcp - Auth type: Bearer token
- Token:
<your-token>
n8n
n8n is a workflow automation tool widely used alongside Home Assistant for multi-step automations that span multiple services. It supports MCP tool nodes via the community MCP node.
Install the MCP community node in your n8n instance, then configure a new MCP Tool node with:
- SSE URL:
http://homeassistant.local:8123/api/selora_ai/mcp - Authentication: Custom header —
Authorization: Bearer <your-token>
This lets you call Selora AI tools (e.g. selora_create_automation, selora_trigger_scan)
as steps inside n8n workflows, enabling you to chain home automation actions with external
triggers like calendars, webhooks, or third-party services.
Continue (VS Code / JetBrains extension)
Open your ~/.continue/config.json file and add Selora AI to the mcpServers array.
Continue uses a different config structure than the command/args format — it accepts an
SSE transport directly. Set SELORA_TOKEN as an environment variable in your shell profile first
(see the token security note above), then reference it in the config:
{
  "mcpServers": [
    {
      "name": "selora-ai",
      "transport": {
        "type": "sse",
        "url": "http://homeassistant.local:8123/api/selora_ai/mcp",
        "requestOptions": {
          "headers": {
            "Authorization": "Bearer ${SELORA_TOKEN}"
          }
        }
      }
    }
  ]
}
Other MCP-compatible clients
If your client supports the command/args stdio format, use the mcp-remote block above.
If it supports native SSE with custom headers, use these values:
- Transport type: SSE
- URL:
http://homeassistant.local:8123/api/selora_ai/mcp - Auth header:
Authorization: Bearer <your-token>
Consult your client’s documentation for where to enter these values.
Docker: HA in Docker, MCP client on the same host machine
This is the most common setup — Home Assistant runs in Docker, and your MCP client (Claude Desktop, Cursor, Windsurf) runs as a normal desktop application on the same machine.
The key point: desktop apps on the host cannot use homeassistant.local to reach a Docker
container. Use localhost instead, since HA’s port is mapped to the host.
Your docker-compose.yml should map port 8123:
services:
  homeassistant:
    image: ghcr.io/home-assistant/home-assistant:stable
    container_name: homeassistant
    network_mode: host  # simplest option, HA gets direct host network access
    volumes:
      - ./config:/config
    restart: unless-stopped
With network_mode: host, Home Assistant binds directly to the host’s port 8123. Your MCP
client config on that same machine then uses:
http://localhost:8123/api/selora_ai/mcp
If you prefer bridge networking instead of host mode, map the port explicitly:
services:
  homeassistant:
    image: ghcr.io/home-assistant/home-assistant:stable
    container_name: homeassistant
    ports:
      - "8123:8123"
    volumes:
      - ./config:/config
    restart: unless-stopped
Same result — http://localhost:8123/api/selora_ai/mcp works from any desktop app on the
host.
Docker: HA and MCP client both running in Docker (n8n, Open WebUI)
n8n and Open WebUI are themselves commonly run as Docker containers. When both HA and your MCP client run in Docker on the same host, they can reach each other by service name — but only if they share the same Docker network.
services:
  homeassistant:
    image: ghcr.io/home-assistant/home-assistant:stable
    container_name: homeassistant
    networks:
      - selora-net
    volumes:
      - ./config:/config
    restart: unless-stopped

  n8n:
    image: n8nio/n8n
    container_name: n8n
    networks:
      - selora-net
    ports:
      - "5678:5678"
    environment:
      - N8N_HOST=localhost
    restart: unless-stopped

networks:
  selora-net:
    driver: bridge
Inside this network, n8n reaches Home Assistant at http://homeassistant:8123. Use that as
the MCP URL in your n8n MCP Tool node:
http://homeassistant:8123/api/selora_ai/mcp
The same pattern applies to Open WebUI — add it to the same selora-net network and point
its tool server URL at http://homeassistant:8123.
4. Verify Connectivity
Run a simple read flow from your client to confirm onboarding is working:
- Call
selora_get_home_snapshot - Call
selora_list_automations
If both return data, the MCP connection is live. If you receive an error, go straight to Troubleshooting below.
5. Recommended First-Run Workflow
- Ask: “analyze my home”
- Ask for an automation proposal and review the YAML before confirming
- Confirm create — automations are disabled by default
- Optionally run
selora_trigger_scanto refresh patterns - Review
selora_list_suggestionsandselora_list_patterns - Confirm
acceptordismissactions explicitly
Troubleshooting
401 / Unauthorized (token auth) — Confirm the token is valid and copied in full. The
header must be exactly Authorization: Bearer <token> with no extra spaces or line breaks.
Tokens are only shown once at creation time — if you lost it, create a new one.
401 / Unauthorized (Selora Connect) — The OAuth token may have expired or the JWT key may be out of sync. Try disabling and re-enabling Selora AI from the Connect dashboard to refresh the credentials. If the issue persists, toggle Selora Connect off and on in the HA integration settings to re-link.
OAuth redirect error / Access Denied — Ensure you are logged in to your Selora Homes Connect account in the browser that opens during the OAuth flow. The account must own the installation linked to the MCP endpoint.
403 / Admin required — Your token does not have permission for this tool. If using a Selora AI token, check its permission level (read-only tokens cannot call write tools). If using an HA token, it must be from an admin account.
Connection errors / timeout — Verify the MCP URL is reachable from the network where your
agent client is running. Common causes: firewall blocking port 8123, using
homeassistant.local inside Docker (use the container IP or service name instead), or using
http for a remote install that requires https.
homeassistant.local not resolving — This mDNS hostname only works on the same local
network segment. Docker containers, remote machines, and VPNs often cannot resolve it. Use
the host’s IP address instead.
Skill not triggering — Confirm the skill files exist at the paths above and restart the agent session.
Wrong automation targeted — Always call selora_list_automations first and use the
returned automation_id. Do not rely on names from memory or previous sessions.
No patterns or suggestions returned — Run selora_trigger_scan first, wait for it to
complete, then retry selora_list_suggestions.
Last modified June 25, 2026: Merge branch 'renovate/posthog-js-1.x-lockfile' into 'main' (93a0b9d)